

SEO Meta Title: How Surgical Instruments Are Made: Complete Guide
Meta Description: Learn how surgical instruments are made, from stainless steel selection and forging to machining, polishing, testing, and final quality inspection.
URL Slug: how-surgical-instruments-are-made
Focus Keyword: How Surgical Instruments Are Made
Related Keywords: surgical instrument manufacturing, surgical instruments manufacturing process, stainless steel surgical instruments, surgical instrument factory, medical instrument manufacturing, surgical instrument manufacturer, surgical tools production, surgical instrument quality control, reusable surgical instruments, surgical instrument polishing
Introduction
Have you ever wondered how surgical instruments are made? Surgical instruments may look simple. However, their production requires several careful steps.
Surgeons use forceps, scissors, clamps, retractors, needle holders, and many other tools every day. Each instrument has a specific purpose. Therefore, its shape, strength, finish, and function are important.
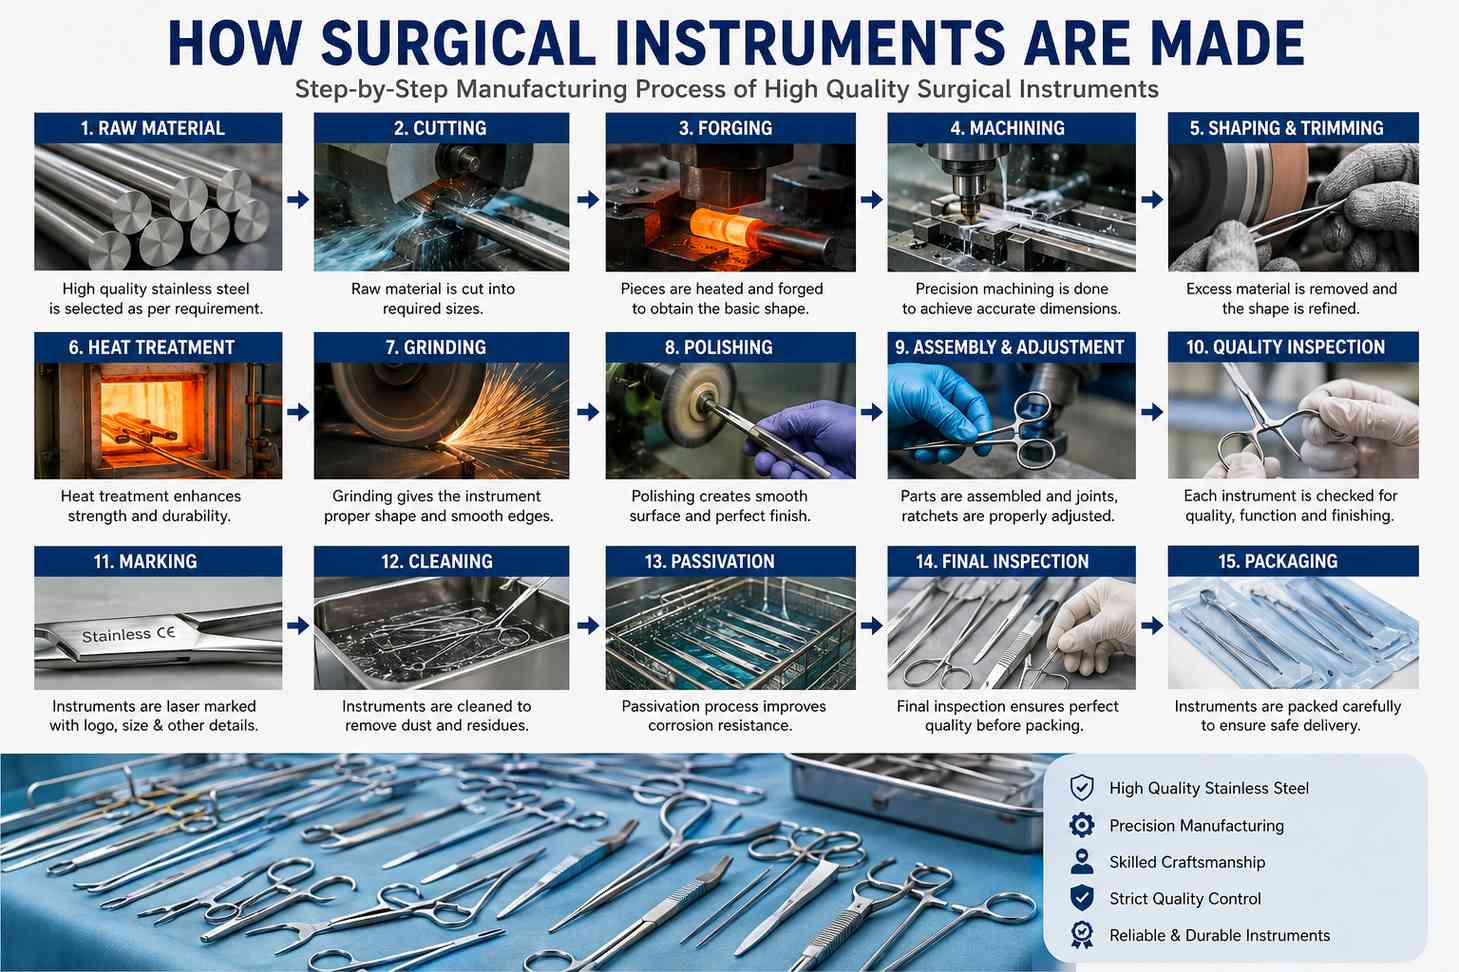
The manufacturing process usually starts with raw material selection. After that, the instrument passes through forming, machining, heat treatment, grinding, polishing, and inspection. Some instruments also require special surface treatments or markings.
Quality control is also a key part of production. Manufacturers must check dimensions, alignment, movement, surface condition, and other product requirements.
In this guide, we explain how surgical instruments are made step by step. We will also discuss materials, manufacturing methods, finishing, testing, packaging, and quality control.
What Are Surgical Instruments?
Surgical instruments are tools designed to perform specific tasks during medical procedures. They help surgeons cut, grasp, hold, clamp, retract, dissect, or manipulate tissue.
Common examples include:
- Surgical scissors
- Tissue forceps
- Dressing forceps
- Hemostatic forceps
- Needle holders
- Retractors
- Surgical clamps
- Bone instruments
- Dental instruments
- Surgical probes
Each instrument has a different design. Therefore, the manufacturing process may also vary.
For example, surgical scissors require sharp and properly aligned blades. On the other hand, tissue forceps require accurate jaw alignment.
A needle holder needs strong gripping jaws. Similarly, a retractor needs suitable strength and shape.
For this reason, manufacturers must follow the correct production method for each product.
Why Is Surgical Instrument Manufacturing Important?
Surgical instruments are used in demanding clinical environments. Therefore, they must perform their intended function consistently.
A poorly made instrument may have rough edges, weak joints, poor alignment, or an incorrect finish. These problems can affect its performance.
Good manufacturing helps provide:
- Accurate dimensions
- Proper alignment
- Smooth operation
- Suitable strength
- Consistent surface finish
- Reliable gripping or cutting action
- Better resistance to corrosion when properly processed
- Consistent product quality
Therefore, every manufacturing stage requires attention.
Step 1: Selecting the Raw Material
The first step in understanding how surgical instruments are made is material selection.
Stainless steel is widely used for reusable surgical instruments. However, different instruments may require different grades or material properties.
The selected material depends on the instrument’s intended use and design.
For example, cutting instruments may require properties different from those needed for forceps or retractors.
The manufacturer should select material that meets the required product specifications.
Material selection can affect:
- Strength
- Hardness
- Corrosion resistance
- Flexibility
- Durability
- Surface quality
- Manufacturing performance
Therefore, choosing suitable raw material is an important first step.
Step 2: Forging and Forming
After material selection, the basic instrument shape must be created.
Forging is commonly used for many surgical instruments. During this process, metal is shaped into a form close to the final product.
The exact method depends on the instrument.
For example, the initial shape of scissors will be different from the shape of forceps.
Forging can help create a strong basic structure. However, the forged piece is not yet ready for surgical use.
It still requires several production steps.
After forging, excess material may be removed. The instrument then moves to machining and shaping.
Step 3: Trimming the Forged Parts
Forging can leave extra metal around the edges.
Therefore, the next step may involve trimming.
During trimming, workers remove unnecessary material from the forged part. This creates a cleaner outline.
The instrument begins to look more like its final shape at this stage.
However, its surface may still be rough. The joint, jaws, teeth, serrations, or cutting edges may also need further work.
For this reason, the instrument moves to machining.
Step 4: Machining
Machining is one of the most important stages in the surgical instrument manufacturing process.
During this stage, specific areas are shaped with greater accuracy.
Depending on the product, machining may be used to create:
- Joints
- Ratchets
- Serrations
- Teeth
- Finger rings
- Grooves
- Slots
- Cutting areas
- Jaw patterns
Precision is important here.
For example, if the teeth of tissue forceps are not machined correctly, they may not meet properly.
Likewise, a poorly machined ratchet may fail to lock smoothly.
Therefore, careful machining helps improve instrument function.
Step 5: Creating Joints and Hinges
Many surgical instruments have moving parts.
Examples include scissors, needle holders, artery forceps, and tissue forceps.
These instruments require accurate joints.
A joint connects the two halves and allows controlled movement. If the joint is too tight, the instrument may be difficult to use.
However, if it is too loose, the jaws or blades may not align correctly.
Therefore, manufacturers must carefully produce and inspect the joint.
Common designs may include box joints, screw joints, or other mechanisms.
The type depends on the instrument.
Step 6: Making Serrations and Teeth
Many surgical instruments use serrations or teeth to improve grip.
For example, artery forceps may have serrated jaws. Tissue forceps may also have teeth at their tips.
These patterns must be accurate and consistent.
Poor serrations may reduce gripping performance. Similarly, incorrectly formed teeth may prevent the jaws from closing as intended.
Therefore, manufacturers use suitable machining methods to create these details.
Afterward, the jaws should be checked for alignment.
Step 7: Heat Treatment
Heat treatment is another important stage when learning how surgical instruments are made.
This process changes certain mechanical properties of the metal.
Depending on the material and instrument, heat treatment can help achieve the required hardness, strength, or other characteristics.
This stage is especially important for cutting instruments.
For example, surgical scissors need edges that can maintain suitable cutting performance. Therefore, their material and heat treatment must be carefully controlled.
However, excessive hardness can also create problems.
The manufacturer must achieve the required balance according to the product specification.
Step 8: Grinding
After heat treatment, the instrument may require grinding.
Grinding removes excess material and helps create the required shape.
This stage is especially important for cutting instruments.
For example, scissor blades must have correctly formed cutting edges. Therefore, workers or machines carefully grind the blades.
Grinding may also improve:
- Jaw shape
- Edges
- Tips
- Instrument profile
- Surface consistency
This process requires skill and precision.
Too much grinding may change the dimensions. Too little may leave rough or incorrect areas.
Therefore, careful control is essential.
Step 9: Instrument Alignment
Alignment can directly affect instrument performance.
For example, the blades of surgical scissors should meet correctly.
Similarly, the jaws of forceps should close according to their intended design.
During alignment, technicians inspect and adjust the instrument.
They may check:
- Jaw position
- Tip alignment
- Blade contact
- Joint movement
- Handle position
- Ratchet engagement
Any problem should be corrected before the instrument moves to final finishing.
This step is especially important for reusable surgical instruments.
Step 10: Polishing and Surface Finishing
After machining and grinding, the surface must be finished.
Polishing removes manufacturing marks and improves the overall appearance.
Surgical instruments may have different finishes depending on product specifications.
Mirror Finish
A mirror finish has a bright and highly polished appearance.
It provides a smooth surface. However, it may reflect more operating-room light.
Satin Finish
A satin finish has a softer, less reflective appearance.
Many surgical instrument buyers prefer this finish because it can reduce glare.
The exact finish depends on the buyer’s requirements and product specifications.
A consistent finish is important for both appearance and surface quality.
Step 11: Cleaning the Instrument
During manufacturing, instruments can collect polishing compounds, oils, dust, and other production residues.
Therefore, thorough cleaning is necessary.
Manufacturers may use different cleaning methods depending on their production system.
The goal is to remove unwanted manufacturing residues before final inspection and packaging.
Special attention should be given to difficult areas.
These may include:
- Joints
- Ratchets
- Serrations
- Grooves
- Teeth
- Hinges
Cleanliness is an important part of final product preparation.
Step 12: Passivation and Surface Treatment
Certain stainless steel surgical instruments may undergo passivation as part of the manufacturing process.
Passivation is a controlled chemical treatment used to support the corrosion-resistant surface of suitable stainless steel.
However, the exact process depends on the material, product specification, and manufacturer’s validated procedure.
Surface preparation must be properly controlled.
Manufacturers should also ensure that the instrument is cleaned and processed according to applicable requirements.
Step 13: Functional Testing
An instrument should not be approved based only on appearance.
It must also work correctly.
Therefore, functional testing is a major part of surgical instrument manufacturing.
The exact test depends on the instrument.
Scissors
Inspectors may check blade alignment and cutting performance.
Forceps
They may check jaw alignment, grip, and opening or closing action.
Needle Holders
Inspectors may check jaw grip, ratchet performance, and alignment.
Hemostatic Forceps
The joint, jaw serrations, and ratchet should operate correctly.
Retractors
Dimensions, shape, surface condition, and strength-related requirements may be inspected.
Each instrument should be evaluated according to its intended design and specifications.
Step 14: Quality Control
Quality control is one of the most important parts of understanding how surgical instruments are made.
Manufacturers need procedures to identify products that do not meet the required specifications.
Quality inspectors may check:
- Length
- Width
- Thickness
- Jaw alignment
- Blade alignment
- Ratchet operation
- Joint movement
- Serrations
- Teeth
- Surface finish
- Product marking
- Cleanliness
- Packaging
Inspection requirements can vary depending on the product and target market.
Manufacturers may also maintain production and inspection records as part of their quality management system.
Step 15: Product Marking
Many surgical instruments require product identification.
Depending on the customer’s requirements and applicable regulations, markings may include:
- Manufacturer name
- Brand name
- Logo
- Product reference
- Size
- Identification information
Laser marking is commonly used for stainless steel instruments.
OEM buyers may also request their own logo or brand marking.
However, all marking requirements should be confirmed before production begins.
Step 16: Final Inspection
Before packaging, the finished instrument should undergo final inspection.
This is the last opportunity to identify manufacturing defects before shipment.
Inspectors may review the instrument’s appearance and function.
For example, they can check whether:
- The instrument opens smoothly
- The jaws align correctly
- The ratchet works properly
- The finish is consistent
- The marking is correct
- There are no obvious surface defects
- The dimensions match the specification
If the product passes the required checks, it can move to packaging.
Step 17: Packaging
Packaging helps protect the instrument during storage and transport.
The packaging method depends on the product, customer requirements, and whether the instrument is supplied sterile or non-sterile.
Reusable surgical instruments are often supplied according to agreed packaging specifications.
Packaging options may include:
- Individual poly bags
- Pouches
- Boxes
- Sets
- Custom retail packaging
- Bulk packaging
OEM customers may also request branded boxes and labels.
Product information should match the purchase order and applicable requirements.
How Different Surgical Instruments Are Manufactured
Although many production stages are similar, each instrument has unique requirements.
Surgical Scissors
Scissors require careful blade grinding and alignment.
Their cutting action should also be checked during inspection.
Tissue Forceps
Tissue forceps require accurate jaw alignment.
Models with teeth also need precise tooth formation.
Needle Holders
Needle holders require strong and properly aligned jaws.
Their ratchet and joint must also work smoothly.
Hemostatic Forceps
These instruments require accurate serrations and reliable ratchet action.
Jaw alignment is also important.
Retractors
Retractors may have simpler moving mechanisms. However, their dimensions, shape, edges, and surface finish still require careful inspection.
Therefore, each instrument needs its own production and quality-control plan.
Role of Skilled Workers in Manufacturing
Machines are important in modern production. However, skilled workers also play a major role.
Experienced technicians can identify small alignment or finishing problems.
They may work on:
- Grinding
- Polishing
- Assembly
- Alignment
- Sharpening
- Final adjustment
- Inspection
The combination of suitable machinery and skilled workmanship can help manufacturers achieve consistent results.
OEM Surgical Instrument Manufacturing
Many medical distributors buy surgical instruments from OEM manufacturers.
OEM production allows buyers to order products under their own brand.
Depending on the manufacturer, OEM services may include:
- Custom logo marking
- Private labeling
- Custom packaging
- Product reference numbers
- Barcode labels
- Different finishes
- Specific sizes
- Custom instrument sets
However, all requirements should be clearly defined before production.
A detailed specification can reduce errors and improve consistency.
What Should Buyers Check Before Ordering?
Importers and distributors should carefully evaluate a surgical instrument supplier.
First, request product samples.
Next, check the instrument’s function, finish, dimensions, and overall workmanship.
Buyers should also review relevant quality and regulatory documentation for their market.
In addition, they should clearly confirm:
- Material requirements
- Product dimensions
- Surface finish
- Packaging
- Marking
- Quantity
- Quality requirements
- Delivery terms
Clear communication is important for successful bulk orders.
Frequently Asked Questions
How are surgical instruments made?
Surgical instruments are made through several steps. These may include material selection, forging, machining, heat treatment, grinding, polishing, cleaning, inspection, marking, and packaging.
What material is used to make surgical instruments?
Stainless steel is widely used for reusable surgical instruments. However, material selection depends on the product design and intended use.
Why are surgical instruments heat treated?
Heat treatment helps achieve required mechanical properties such as hardness and strength. The exact treatment depends on the material and instrument.
Why are surgical instruments polished?
Polishing improves the surface finish and removes manufacturing marks. It also gives the instrument its required final appearance.
What is a satin finish?
A satin finish is a less reflective surface finish. It is commonly used on surgical instruments to provide a smooth and professional appearance with reduced glare.
Are all surgical instruments made in the same way?
No. The process varies according to the instrument. For example, scissors need precise cutting edges, while forceps require accurate jaw alignment.
Can surgical instruments be custom manufactured?
Yes. Many manufacturers offer OEM services. Buyers may request custom sizes, finishes, logos, packaging, and product references.
Conclusion
Understanding how surgical instruments are made shows how many steps are involved in producing a finished medical tool.
The process starts with suitable raw material. After that, the instrument may pass through forging, trimming, machining, heat treatment, grinding, alignment, polishing, and cleaning.