Introduction
Sterilization is one of the most essential processes in any medical, dental, or surgical setting. It ensures that surgical instruments are completely free from harmful microorganisms, including bacteria, viruses, fungi, and spores. Proper sterilization not only prevents infections but also protects both patients and medical professionals.
In this article, we’ll explore the different sterilization methods of surgical instruments, how each method works, their advantages, and best practices to maintain instrument quality and longevity.
If you’re a healthcare professional, manufacturer, or supplier of surgical tools, understanding these sterilization techniques is vital to ensure safety, compliance, and reliability.
Why Sterilization Is Important
Surgical instruments come into direct contact with tissues, blood, and internal organs during medical procedures. Even a trace amount of contamination can lead to postoperative infections, sepsis, or cross-contamination.
Therefore, sterilization plays a critical role in:
- Eliminating all forms of microbial life
- Reducing hospital-acquired infections (HAIs)
- Ensuring patient safety and faster recovery
- Maintaining the reputation and compliance of healthcare facilities
According to the World Health Organization (WHO), effective sterilization can reduce surgical site infections by more than 30%.
Main Sterilization Methods of Surgical Instruments
There are several proven methods used to sterilize surgical instruments. Each technique depends on the material of the instrument, the type of contamination, and available equipment. Below are the most widely used sterilization methods in hospitals and clinics.
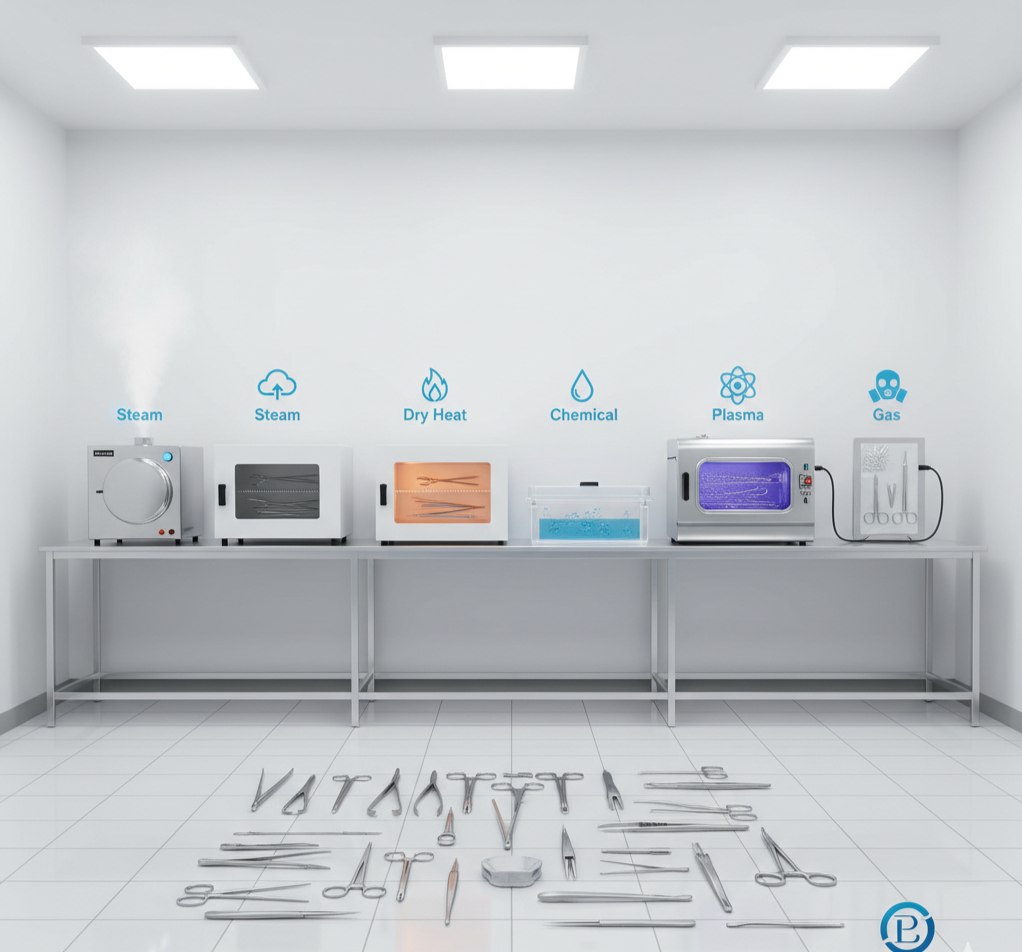
1. Steam Sterilization (Autoclaving)
Steam sterilization, commonly known as autoclaving, is the most reliable and widely used method for sterilizing surgical instruments.
How It Works:
An autoclave uses pressurized steam at high temperatures (usually 121°C to 134°C) for a specific period (typically 15–30 minutes). The combination of heat, steam, and pressure destroys all microorganisms, including resistant bacterial spores.
Advantages:
- Highly effective and fast
- Safe for most metal instruments
- Eco-friendly (no toxic chemicals)
- Cost-effective
Limitations:
- Not suitable for heat-sensitive items (e.g., plastics, electronics)
- May cause corrosion in carbon-steel instruments if not dried properly
Best Practice Tip:
Always clean and dry instruments thoroughly before placing them in the autoclave. Use distilled water to prevent mineral buildup.
2. Dry Heat Sterilization
Dry heat sterilization uses hot air that is free from moisture. It’s ideal for instruments that may corrode or become dull when exposed to moisture.
How It Works:
The process involves heating instruments in a hot air oven at temperatures between 160°C and 180°C for 1–2 hours. The dry heat oxidizes cell components and denatures microbial proteins, effectively killing microorganisms.
Advantages:
- No moisture, so no rusting or corrosion
- Ideal for glassware, powders, and sharp metal tools
- Simple and inexpensive
Limitations:
- Longer sterilization time
- Uneven heat distribution if instruments are stacked
Best Practice Tip:
Place instruments in perforated trays and ensure adequate airflow inside the sterilizer for uniform heating.
3. Chemical Sterilization
Chemical sterilization, also known as cold sterilization, involves using liquid chemical disinfectants to sterilize instruments that cannot withstand high heat.
Common Chemicals Used:
- Glutaraldehyde
- Formaldehyde
- Peracetic acid
- Hydrogen peroxide
- Ethylene oxide (ETO gas)
How It Works:
Instruments are fully immersed in the chemical solution for a specified time (usually 6–10 hours). These chemicals kill microorganisms by disrupting their cell membranes and DNA.
Advantages:
- Suitable for heat-sensitive instruments
- Effective against bacteria, viruses, and spores
Limitations:
- Toxic fumes require proper ventilation
- Time-consuming
- Residual chemicals must be rinsed off thoroughly
Best Practice Tip:
Always rinse instruments with sterile water after chemical sterilization to remove any residue that might cause irritation or corrosion.
4. Gas Sterilization (Ethylene Oxide Sterilization)
Gas sterilization using ethylene oxide (ETO) is highly effective for delicate instruments that are sensitive to heat and moisture.
How It Works:
ETO gas sterilizes by alkylating proteins and DNA of microorganisms, which prevents them from replicating. The process is carried out at 37°C to 63°C with controlled humidity for 3–6 hours, followed by aeration to remove gas residues.
Advantages:
- Suitable for plastic, rubber, and optical instruments
- Highly effective against all microorganisms
- Penetrates complex instrument surfaces
Limitations:
- Expensive and time-consuming
- Requires aeration due to toxic residues
- Needs trained personnel and safety precautions
Best Practice Tip:
Store ETO-sterilized instruments in a clean, aerated room for at least 12 hours before use to ensure complete gas removal.
5. Plasma Sterilization (Hydrogen Peroxide Plasma)
Plasma sterilization is a modern, eco-friendly method ideal for temperature-sensitive surgical instruments.
How It Works:
The system uses vaporized hydrogen peroxide that is converted into plasma (ionized gas) using electromagnetic fields. The plasma destroys microorganisms through oxidation at low temperatures (below 50°C).
Advantages:
- Fast and residue-free
- Safe for delicate instruments
- Non-toxic and environmentally friendly
Limitations:
- Not suitable for cellulose-based materials (like paper or fabrics)
- High equipment cost
Best Practice Tip:
Ensure instruments are completely dry before plasma sterilization for optimal performance.
6. Radiation Sterilization
Radiation sterilization is primarily used for disposable medical products and packaged instruments.
How It Works:
It uses ionizing radiation such as gamma rays or electron beams to destroy microorganisms by damaging their DNA.
Advantages:
- Effective for large-scale sterilization
- Can sterilize sealed packages
- No heat or moisture involved
Limitations:
- Expensive setup
- Limited to industrial use
Pre-Sterilization Steps
Before any sterilization process, instruments must go through cleaning and preparation steps to ensure effectiveness:
- Cleaning: Remove visible debris using detergent and water or ultrasonic cleaners.
- Rinsing: Rinse with distilled or deionized water to avoid residue.
- Drying: Ensure instruments are fully dry to prevent corrosion.
- Inspection: Check for damage or wear.
- Packaging: Wrap or pouch instruments properly for sterilization and storage.
Post-Sterilization Handling
After sterilization, instruments must be handled with care to prevent recontamination:
- Store in a sterile, dry, and dust-free area
- Label sterilized packs with date and batch number
- Avoid touching instruments with bare hands before use
Proper handling ensures instruments remain sterile until the next procedure.
Conclusion
Understanding the sterilization methods of surgical instruments is crucial for maintaining hygiene, safety, and quality in medical environments. Whether you use steam, dry heat, gas, chemical, or plasma sterilization, the key is to choose the method that best suits your instruments and facility needs.
At Professional Enterprises, we manufacture and supply high-quality surgical and dental instruments designed to withstand rigorous sterilization procedures. Our instruments are made from premium stainless steel, ensuring durability, precision, and long-term reliability in every use.